Monday, July 30, 2012

pizza rolls with cherry tomato sauce


yeast bread may sound intimidating, but i encourage you to try it! summer is a great season, with hot and humid weather working in your favor. so break out the yeast, take a few hours at home and give this pizza roll recipe a try. this one is a good start because it only requires one rise, and you will just roll it out in one big piece. (not ready for yeast dough? just substitute your favorite store-bought pizza dough for the homemade version i make here)

when starting out with yeast dough recipes, i recommend using active dry yeast. this type of yeast has been dried out to increase its shelf life. you then need to reactivate, or "proof", this yeast to wake it up from its dry, dormant state. a successful proof lets you know that your yeast is alive and ready to work to leaven your dough [and that you did not kill it by using too hot water]. proof 2 packets of yeast [or 4.5 tsp yeast] with 1 cup warm water and a big pinch of sugar on top. the water should technically be between 105 and 110 degrees F, if you are inclined to measure it. thermometer or not, stick your hand in the water to get a feel for the temperature. it should be warm to hot, but not so much that you cannot keep your finger in the stream of water.


while your yeast is proofing, measure out your flour by sprinkling it into the measuring cup with a spoon and leveling of the top with a straight edge. or if you own a kitchen scale you can consult the ingredient weight chart over at King Arthur Flour. out of curiosity, i sprinkled, then weighed my flour. my sprinkled and leveled cup for the whole wheat flour clocked in a little under the recommended amount, while my sprinkled and leveled cup of bread flour was a little over. in the end i suppose it all evens out.


if you don't have a kitchen scale, don't fret. yeast dough depends on environmental factors and the water to flour ratio may be affected by moisture in the air. when in doubt, for a whole wheat and soft bread dough i always make the dough on the sticky side. whole wheat flour absorbs more water than regular AP flour, so it is easy for dough to become dense, and thus not get a good rise. as the dough rises, the gluten will develop and the water will distribute more evenly. so while it may still be sticky at first, it will be more manageable to handle after it rises and you will be rewarded with a softer bread.


once your yeast looks nice and frothy [after about 10 min], add it to your flour and salt mixture. if you are using an electric mixer, combine the ingredients with the paddle attachment by pulsing, until it starts to come together. at this point adjust the water [or flour] to get a soft, but not too sticky dough. My dough was moist, but not sticky enough that if I touch it with my finger, the dough sticks to it easily.
then it is time to knead the dough. about 5 minutes in an electric mixer (switch over to the dough hook now) should do it, or about 10 minutes of kneading by hand. work the dough until it becomes somewhat smooth, but still sticks slightly to the bottom of the bowl.


i like to use a transparent, tall, and straight-sided container to watch my dough rise. [here i just used a plastic pitcher] mark with scotch tape where your dough ends, and you can easily tell when it has doubled. an over-risen dough may puff up in the oven, then crash and become dense. go by how much your dough rises, rather than being a stickler about the time.


while your dough rises, take the time to prepare your cherry tomato "sauce".


cut your tomatoes in halves or quarters, depending on how large they are. combine these with a large clove of garlic, minced and then smashed with 1/2 tsp salt. add in the zest from one lemon, 1/2 cup extra virgin olive oil and 1/2 cup finely grated parmesan cheese.


your "sauce" mixture should look something like this:


meanwhile, your dough by now may look something like this:


you can see my tape mark if you look closely. it was a hot day and my dough rose a little faster than i expected. so it more than doubled. c'est la vie. scrape it out of the container onto a floured surface and mound it into one piece.


roll out your dough into a rectangle, roughly 14" x 22". leave the dough thicker in the center and thinner on the lengthwise ends. you will be folding the dough over so this will help to keep your rolls even. lay on 4 oz prosciutto, 1 cup fresh, ripped basil leaves, and your tomato sauce mixture.


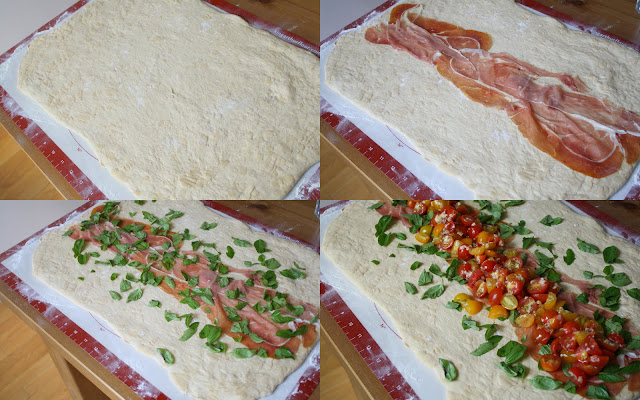
fold the bottom third over the filling, then the top third over that. pinch the seam to seal the dough, and you are ready to cut your rolls. disclaimer: this is a tad bit messy. just use your sharpest knife, and don't worry about making perfect rolls. they will have character in a 'rustic' sort of way. mark and cut to make 10 slices, and one by one transfer the rolls to a parchment covered baking sheet.


i overlapped my rolls slightly so they fit on the pan, but if you prefer you can leave space between them and bake them on two sheets. if you lost any tomatoes in the transfer process, be sure to pile them back on top of the rolls.


bake the rolls for 25-35 minutes at 425 degrees f.


try to have patience and let them cool slightly before digging in. they are most delicious warm, and you can easily reheat them in the oven or toaster oven later.


based on: Better Homes and Gardens magazine

pizza rolls with cherry tomato sauce

ingredients:

for the dough:
2 cups warm water
4.5 teaspoons [or 2 packets] active dry yeast
1 pinch of sugar
2 cups white whole wheat flour
2 cups bread flour
2 tsp salt

for the sauce:
1 large garlic clove, minced
1/2 tsp salt
3 cups cherry tomatoes, halved or quartered
1/2 cup finely grated parmesan cheese
1/2 cup olive oil
zest from 1 lemon
1/2 tsp ground pepper

4 oz thinly sliced prosciutto
1 cup fresh basil leaves

directions:

1. proof your yeast by combining it in a bowl with 1 cup warm water, and a pinch of sugar. let it sit for 10 minutes before adding remaining 1 cup of warm water.

2. combine flours and salt in a mixing bowl, then add proofed yeast and mix until starting to combine. if the dough appears too dry to come together, add a few extra tbsp warm water.

3. once dough is combined thoroughly [either with paddle attachment on mixer or a spoon], knead the dough [with the dough hook attachment, or your hands] until the dough is smooth.
4. place dough in a lightly greased container and cover with a kitchen towel or saran wrap. let rise until doubled in bulk, about 1 to 2 hours.

5. while dough is rising, use the side of a chef's knife to smash the minced garlic with the salt to make a paste. combine this past with the remaining sauce ingredients and mix thoroughly.

6. once dough is risen, preheat oven to 425 degrees F. scrape out dough onto a well floured surface. roll out dough to roughly a 22" x 14" rectangle. lay out prosciutto across the middle of the rectangle lengthwise, and scatter the basil leaves, ripping them as you go. spoon the tomato sauce along the center over the prosciutto. fold the bottom third, then top third over the sauce and pinch the seam to close. 

7. slice into 10 pieces, moving them one by one onto a parchment lined baking sheet. place the rolls right next to one another. bake rolls for 25-35 minutes, until the dough is lightly golden brown and the crust sounds hollow when tapped. let cool slightly and serve warm.

Monday, July 23, 2012

peach pops

it's peach season, and so i wanted to choose a recipe that highlighted the bright flavor of the peaches i found at the greenmarket. any excuse to use our new ice pop maker, so i was excited to find that the recipe book features a peach version. without further ado...


this recipe couldn't be simpler. i actually avoided peaches for years because their fuzzy skins drove me away. i thought nectarines were a good enough substitute. but sweet, fragrant peaches in summer are not to be missed. and there is an easy way to peel them!


blanch the peaches in boiling water for about 10 seconds, then plunge them into an ice water bath. the skin should slide off easily, leaving you with a rather slippery, yet perfectly peeled peach.


slice the peach flesh off of the pit, and cut into chunks.


combine the peach chunks with the peach nectar, greek yogurt, agave syrup and lime juice in the pitcher of a blender. 


blend for about 30 seconds-1 minute or until smooth.


pour your liquid into any popsicle mold, and freeze according to directions. the quickpop maker will freeze the first two pops in about 7 minutes.


remove the pop from the popsicle mold when completely frozen, and admire it's peachy hue.


a refreshing dessert!


peach pops with fresh market peaches and greek yogurt
makes 6 pops

ingredients:

1 1/2 cups fresh peach chunks
1/2 cup peach nectar
1 1/2 tsp lime juce
1 1/2 tsp agave nectar
3 tbsp plain yogurt [i used greek]

directions:

1. combine all ingredients in a blender, and blend until smooth for about 1 minute.

2. fill ice pop molds with blended liquid and freeze until solid. i like this quickpop maker for instant gratification.

3. remove pops from popsicle mold and enjoy!


Friday, July 20, 2012

whole wheat tortilla wraps with grilled zucchini


with zucchini abounding at the farmers market, there are so many summer recipe opportunities to use it. i bought one giant zucchini, and it was enough for a recipe of zucchini muffins, these delicious whole wheat tortilla wraps with grilled zucchini, and a side dish for the next day.


originally i was looking for a flatbread recipe, when i came across a recipe for wheat flour tortillas in the new classic How to Cook Everything. the original recipe calls for all-purpose flour, but i subbed white whole wheat flour for all of the AP and it worked perfectly.
combine the dry ingredients for the tortillas in a bowl. add the canola oil in a drizzle and stir it around with a spoon until it looks clumpy, like this:


add in the water a couple tbsp at a time, mixing with a spoon in between. i made them on a humid day in NYC, so i used 1/2 cup. if the weather is not humid, you might need to add a few tbsp extra water for it to pull together nicely. 


once it looks moist enough to pull together in a ball, you are ready to knead it:


the dough will look quite shaggy at this point:


knead your dough until it becomes smoother, rather than the original craggy appearance.


let your dough rest, wrapped in saran wrap, for about an hour. the gluten will develop and the moisture will distribute evenly, so try not to skip this step.
while your dough is resting, you can slice up your vegetables and grill the zucchini. i had a large zucchini, so i chose to cut rounds about 1/4 inch thick. if you are grilling smaller zucchini, i would suggest making the slices lengthwise so that they are in bigger pieces for your wraps.

without the luxury of a grill, i rely on my trusty grill pan to help me cook the zucchini. brush the rounds with olive oil. if you want more defined grill marks, add a few drops of agave syrup or honey to your olive oil before brushing it on. this will help you get darker grill marks as the sugar will brown faster. grill zucchini rounds in batches, for about 1-2 minutes per side.


cut your cucumber and beets into matchstick sized pieces, or thin slices.


with your vegetables ready, you can now grill your tortillas. ready your work surface with a light dusting of flour [a silicone mat, wood cutting board, or clean countertop all work well]. 


divide the dough into 6 pieces and flatten them into round discs.


one disc at a time, use a rolling pin [or a glass bottle with straight sides, like a wine bottle] to roll out the tortillas to about an 8 inch circle. the dough should be really thin. if your dough has rested, it should roll out pretty easily.


once rolled out, place tortilla dough on the hot grill pan. you will see small bubbles start to appear on the surface as it begins to cook. 


flip after 1-2 minutes, grilling for another minute on the second side. if your grill pan is too hot they make come out a little crispy, so adjust time and temperature as needed. keep the grilled tortillas under a dish towel in a warm place while you grill the rest.


now it's time to assemble the wraps. in a play on tsatziki sauce, i use a smear of plain greek yogurt and slices of cucumber. i added an equal amount of homemade hummus, and leftover beets to round out the colors and to add flavor. feel free to swap in any sliced crispy vegetables [peppers, carrots, etc.] you have on hand for the same texture.


Enjoy your homemade wrap!


whole wheat tortillas with grilled zucchini

based on: wheat flour tortillas by Mark Bittman
makes 6 tortillas

ingredients:

for the tortillas:
1 1/2 cups white whole wheat flour
1/4 tsp salt
2 tbsp canola oil
1/2 cup warm water, adjusting for the humidity
extra flour for dusting work surface

1 tbsp olive oil
1/4 tsp agave syrup or honey
salt and pepper, to taste

for the fillings:
2 small or half of 1 large zucchini, cut into thin slices
1 1/2 cups cucumber, cut into matchsticks or slices
1 1/2 cups cooked beets, cut into matchsticks or slices
3/4 cup plain greek yogurt
3/4 cup hummus

directions:

1. combine 1 1/2 cups white whole wheat flour and salt in a bowl. stir to combine. drizzle 2 tbsp canola oil over the flour mixture and stir with a spoon until it is lumpy.

2. a few tbsp at a time, add in the 1/2 cup water. stir in between adding to check if the dough will come together. add a few extra tbsp of water if the dough does not come together.

3. knead dough for 4-5 minutes until it is smooth, and no longer had its shaggy appearance. shape it into a ball, wrap in saran wrap, and let it rest for at least 1 hour at room temperature.

4. while the dough is resting, cut your cucumber and beets into matchstick size pieces. slice the zucchini into rounds [for a large zucchini] or in slices [for a small zucchini].

5. preheat a grill pan for a few minutes. add a squirt [about 1/4 tsp] to about 1 tbsp olive oil. brush the zucchini slices with the oil mixture as you lay them on the grill. salt and pepper the slices. grill for 1-2 minutes on the first side, and 1 minute on the second side. once cooked through, remove the slices and let cool on a plate.

6. after the tortilla dough has rested, divide the dough into 6 pieces. lightly flour your work surface, and shape your dough pieces into flat discs. roll out each disc, one by one, until they are about 8 inches in diameter. the dough will be very thin, but will easily hold its shape.

7. grill each piece of rolled out tortilla dough for about 2 minutes on the first side, and about 1 minute on the second. adjusting the heat under the pan as needed to prevent your tortilla from over-crisping.

8. fill tortillas with about 1.5 tbsp each yogurt and hummus, 4-5 zucchini rounds [or 2-3 long slices], 1/4 cup each cucumber and beets. fold in sides of wrap and eat! 

Thursday, July 19, 2012

homemade hummus

with vegetables abounding at the farmer's market in summer, there are endless ways to use them to complement your cooking. but sometimes it is hot and humid, so heating up your kitchen to make a grand meal may seem less rewarding than usual. enter homemade hummus, a perfect dip to take on your vegetables throughout the seasons.


this simple version comes together quickly and uses the convenience of canned chickpeas. start with one can:


reserve 1/4 cup of the liquid from the can, then rinse the rest of the chickpeas in a strainer. combine rinsed chickpeas with the remaining ingredients in a food processor.


use long pulses to throughly combine and chop the ingredients, until the chickpeas start to become smooth. without a lot of liquid, it will still remain sort of chunky:


add the 1/4 cup of liquid that you reserved to the chickpea mixture, and turn the food processor on for 2-3 minutes until the hummus is smooth:


and you're done! transfer the hummus to your serving dish of choice. smooth the top and use the tip of a spoon to create a spiral. drizzle olive oil into the spiral when ready to serve:


for some added color, try a sprinkle of paprika [and/or some cumin] to the dish.


recipe source: About.com


homemade hummus


ingredients:


1 16 oz can chickpeas
1/4 cup liquid from chickpea can, reserved
4 tbsp lemon juice
2 tbsp tahini
2 cloves fresh garlic, peeled
1/2 tsp salt
2 tbsp olive oil


to garnish [optional] :


olive oil
paprika or cumin


directions:


1. reserve 1/4 cup liquid from canned chickpeas and set aside. rinse remaining chickpeas and let most of the water drain out of the strainer.


2. in the bowl of a mini food processor, combine the rinsed chickpeas, lemon juice, tahini, garlic gloves, salt, and olive oil.


3. combine ingredient using long pulses with the food processor, until mixture is chunky and comes together.


4. add in the reserved 1/4 cup chickpea liquid and turn on food processor for 2-3 minutes, or until it reaches the desired smoothness.


5. garnish top with olive oil and paprika or cumin when ready to serve.