Sunday, March 17, 2013

roasted garlic mashed potatoes

when it comes to mashed potatoes, i like mine with a bit of texture to them. my mom's creamy and smooth mashed potatoes are too delicious for anyone else to replicate, so i usually take a different road when making them for myself. i leave the skins on, add some dairy for mashing ability, and throw in a lot of roasted garlic to whip up some skin-on roasted garlic mashed potatoes.


start by roasting your garlic. an awesome way to mellow and sweeten the flavor of garlic, roasting it is an effortless process.


take a head of garlic, and chop off the top half-inch or so - to expose the cloves.


place them on a piece of foil large enough to fold them in, and drizzle generously with olive oil, ensuring that some oil gest on all of the cloves.


fold or crumple the foil to enclose the garlic heads, place the packet on a cookie sheet, and roast for 35-45 minutes in the oven at 400 degrees F.


while the garlic roasts, you can prepare the potatoes. i had russet potatoes on hand, although yukon golds are usually my tuber of choice. any type of potato should work.


make sure you scrub them well, since the skins will stay on for this recipe. cut them into relatively even sized pieces to ensure even cooking.


cover the potatoes in water and bring to a boil. reduce heat to a low boil and cook for 15-20 minutes until you can easily pierce any piece with a fork. you should not feel resistance in the potato when you poke it.


once the potatoes are soft, transfer them to a colander to drain. then, return them to the pot.


if you timed it right, your garlic should be just about finished. the cloves will be soft and golden brown.


squeeze the head of garlic near the base, and the soft cloves should come right out.


the garlic will be mashable, and at this point it makes a delicious spread for crusty bread.


now back to the potatoes: use yogurt to add some creaminess and to make mashing easier.


add in your mashed garlic (i used 2 small heads) and some salt to taste.


mash it around until everything is combined. you can add a splash of milk if you like more moisture in mashed potatoes.


to serve, i usually reserve a few cloves, mash them up and put them on top for garnish (and extra garlicky flavor!)


roasted garlic with olive oil
makes 3 heads of roasted garlic

ingredients:

3 heads of garlic
1 tbsp olive oil

directions:
1.   preheat the oven to 400 degrees F.
2.   cut the top 1/2 inch or so off the top of the heads of garlic. the cloves should all be exposed.
3.   place the garlic heads on a piece of foil large enough to enclose them in, and drizzle with the olive oil. be sure the oil gets on each clove to prevent burning.
4.   crumple or fold up the foil around the heads of garlic, and place on a cookie sheet. roast for 35-45 minutes until the cloves appear golden brown and are very soft.
5.   let cool slightly, then squeeze the garlic cloves out using gentle pressure from the base.


skin-on roasted garlic mashed potatoes
makes about 4 servings

ingredients:

1.5 lbs potatoes (russet or yukon gold are good options)
cloves of 2 small heads of roasted garlic (recipe above)
2 tbsp greek yogurt
salt, to taste
splash of milk, optional

directions:


1.   cut potatoes into chunks of equal size.
2.   cover the potatoes in water in a medium pot and bring to a boil.
3.   once boiling, reduce to a low boil and let cook for aobut 15-20 minutes or until your potatoes can be pierced easily with a fork.
4.   strain the potatoes with a colander and then return to the pot.
5.   add the greek yogurt, roasted garlic, and a splash of milk if desired.
6.   mash until you reach the consistency you like and add salt to your tastes.


notes:

- try spreading the roasted garlic on toasted bread for a delicious appetizer!


Sunday, March 10, 2013

homemade granola

granola is one of the easiest recipes that i make regularly. it also uses minimal dishes (two bowl and a cookie sheet) and has a quick prep time. i've been working off the same basic recipe for awhile, but i often mix up the ingredients based on what i have. this recipe for homemade granola with a hint of maple is my favorite, chock full of nuts, oats and seeds.

start off by measuring the oil, then the syrup into a bowl. oil first is important because it leaves a coating in the measuring cup that helps release the sticky maple syrup.

mix your dry ingredients- oats, nuts, and any large sized seeds like pepitas- in a larger bowl. 


add any smaller or more fine dry ingredients (wheat germ, spices, and sesame seeds) to your oil and syrup mixture.


i have found that coating them completely in the liquid helps them adhere to the oats and nuts better than if they are mixed with the other dry ingredients.


pour the liquid into the bowl of nuts and oats and stir for about 30 seconds or until everything looks evenly coated.


spread it out on a cookie sheet (lined with parchment) and bake at 350 for 15 minutes.


after 15 minutes, give everything a stir and then spread it out evenly again. 


sprinkle dried coconut over the top. 


and return to the oven for an extra 15-20 minutes until it starts to brown.


while this is a pretty loose granola, there will be more clumps if you let it cool a bit first before storing. 


once it cools, you can store it in a tightly sealed container. sprinkle it on top of yogurt and fruit for a homemade parfait.


inspiration from Mark Bittman's granola

homemade granola with nuts and maple syrup
makes about 6 cups of granola

ingredients:

3 cups old-fashioned oats
2 cups mixed nuts, chopped (i used half pecans, half almonds)
1/4 cup pepitas
1/4 cup coconut oil, melted
1/4 cup maple syrup or honey
1/4 cup sesame seeds
1/4 cup wheat germ
1 heaping teaspoon cinnamon
a pinch of salt

1/2 cup dried coconut flakes (unsweetened)

directions:

1.   preheat the oven to 350 degrees F. mix the oats, nuts and pepitas in a large bowl and set aside.

2.   mix the oil and maple syrup (or honey) in a small bowl. add the sesame seeds, wheat germ and spices, and mix until they are combined.

3.   add this liquid mixture to the dry ingredients you set aside, and mix for about 30 seconds or until everything looks evenly coated.

4.   spread your granola mixture out evenly on a parchment lined cookie sheet. bake for 15 minutes.

5.   remove granola from oven, give it a stir, and then sprinkle evenly with dried coconut flakes. return to the oven for an additional 15-20 minutes until the granola looks toasted and the coconut is lightly browned. let cool completely and store in an airtight container.


notes:

- i prefer to eat my granola with fresh or lightly cooked fruit. but if desired, you can certainly add dried fruit to yours after it has cooled completely.

- i used half almonds, half pecans here because that was what i had. i routinely use cashews (a personal favorite), peanuts, and walnuts too.

-measurements for this recipe are very forgiving. if you are missing an ingredient you can most likely just sub something else in your pantry as long as your liquid and dry ingredients are in a similar proportion.

- in the parfait pictures above, i cooked up some apple chunks with cinnamon, allspice and a little water in a skillet until they softened.

Sunday, March 3, 2013

roasted root vegetable mash


in the winter season, it is sometimes too cold/wet/rainy for me to want to go to the outdoor market. when i do, i am rewarded by the abundance of apples, pears, greens, and root vegetables. recently at a restaurant, i had a mix of vegetables mashed together. I decided to make my own version at home. roasting the vegetables caramelizes them, lending a sweet flavor to the puree. with a nice blend of vegetables, try making roasted root vegetable mash. it is a perfect and simple side dish for these colder months.


start by peeling the vegetables you will be using.


you can pick out any starchy vegetable at your market, but here i used about half of one butternut squash, a small sweet potato, two carrots, and two parsnips.

once they are peeled, chop them up into uniform pieces. if you know one vegetable will take longer to cook, you can chop it up a little smaller so they can all roast on the same pan.


mix the vegetables in a bowl with olive oil and a generous sprinkling of salt and pepper.


spread them out on a parchment lined baking sheet, and roast at 400 degrees F for 35-45 minutes.


once they start to caramelize and are soft enough to pierce easily with a fork you can take them out.


let them cool slightly, then put into a container that allows you to use an immersion blender easily. add 1/2 cup chicken or vegetable broth.


blend, blend, blend until the vegetables break up and start to become smooth. add in more broth 1/4 cup at a time until it reaches the consistency you like.

you can plate in a large bowl for family style, or plate individual portions on each plate. 


you can garnish the top with pecans. or chop the pecans and sprinkle them on top of the plated vegetable mash for a crunchy texture.


inspired by a side at Hu Kitchen

roasted root vegetable mash with butternut squash, sweet potato, carrot and parsnip

makes about 2 cups

ingredients:

6 cups of peeled and chopped root vegetables
(i used: half of one butternut squash, 1 small sweet potato, 2 carrots and 2 parsnips)
1 tbsp olive oil
salt and pepper, to taste
1/2 - 1 cup chicken or vegetable broth

1/4 cup pecans, whole or chopped (optional)


directions:

 1.   preheat oven to 400 degrees F. coat the peeled and chopped root vegetables with the olive oil in a bowl. give a liberal sprinkling of salt and pepper to your tastes, and incorporate that in.

2.   spread the oiled vegetable pieces on a nonstick baking tray, lined with parchment for easy cleanup.

3.   bake for 30-45 minutes until you can smash or pierce easily a piece with a fork. you want the veggies to be fully cooked, but not dried out from overcooking. i took mine out when they were just starting to caramelize.

4.   cool vegetables slightly, then transfer roasted vegetables to a container with tall sides that will allow your immersion blender to fit easily.

5.   add in 1/2 cup vegetable or chicken broth. slowly start to blend the vegetables and the broth with an immersion blender. if it seems dry, add in additional broth 1/4 cup at a time. (for my vegetables, i ended up using about 3/4 cup of chicken broth)

6.   once you are done blending you can either transfer them to a plate for serving family style, or portion onto individual plates. sprinkle with pecans before serving, if desired.


tips:

- even if you overbake your vegetables, you can easily add more chicken broth to help blend

- if you are using different vegetables that you know may take longer to cook, you can just cut it in smaller pieces compared to other quicker-cooking types. this way you can cook them all for the same amount of time,

- this is a good side dish to a meal with an acidic sauce. i served it with chicken breast with a balsamic vinegar pan sauce.

Sunday, February 10, 2013

dutch baby pancake with sautéed apples

i thought it would be a fun way to try out my new cast iron skillet by making a  "dutch baby" pancake. like a giant popover, the batter is soft and eggy without being overly sweet. the batter is easy to make either by hand or in the blender, and it makes a lovely addition to brunch or as a dessert to finish a meal. i topped it with sautéed apples, as this time of year they are delicious from the farmer's market. you can enjoy this whole wheat dutch baby pancake year round by topping it with any seasonal fruit.


start by coring and slicing the apples into thin pieces.


 sauté the apples for about 5 minutes in 1/2 tbsp butter with a sprinkling of cinnamon, allspice, and maple syrup.


fresh and high quality ingredients make a difference here, as the recipe calls for so few.


to your eggs you will add 1/2 cup flour. i opted for whole wheat pastry flour.


add 1/2 cup milk. i usually have 1% on hand.


for ease, i just threw the eggs in the blender for a few seconds, and then added the rest of the ingredients. pulse a few times and then let the blender run for about 5-10 seconds.


 melt 1.5 tbsp of butter in the cast iron skillet on the stovetop. once it is melted, tilt the pan to coat the bottom and partially up the sides.


 pour the batter into the hot skillet, and then carefully transfer the skillet into a preheated oven. bake for 20-25 minutes until it is puffy and golden brown.


 the outer crust is a good indication of when the pancake is done, and there shouldn't be any uncooked batter.


 top with the warm sautéed apples, and you are done! the pancake is delicious served warm.


you can slide the whole pancake out of the skillet to cut it, or just slice pieces as you would a pie. refrigerate the leftovers and reheat in the oven or toaster oven.


recipe based on the whole foods recipe

whole wheat dutch baby pancake with sauteed apples
serves 4-6

ingredients:

1 large apple, cored and sliced thinly
1/2 tbsp butter
~ 1/4 tsp cinnamon (or more to taste)
~1/8 tsp allspice (to taste)
1-2 tsp maple syrup

4 eggs
1/2 cup whole wheat pastry flour
1/2 cup low-fat milk
1/2 tsp cinnamon
1/4 tsp vanilla extract

optional garnish ideas: lemon juice to squeeze on top, extra maple syrup, yogurt

directions:

1.   preheat the oven to 425 degrees F. heat a nonstick skillet over medium heat and melt 1 tbsp butter. when the butter is melted, toss in the sliced apples. sprinkle with cinnamon and allspice, and cook for about 5 minutes until the apples soften. near the end of cooking, add 1-2 tsp maple syrup to taste.

2.   in a blender, crack the 4 eggs and pulse a few times. add the flour, milk, cinnamon, and vanilla. pulse a few times, then blend for 5-10 seconds until completely combined.

3.   melt 1.5 tbsp butter in a 10 inch cast iron skillet. tilt the pan to coat the bottom on partially up the sides of the pan. pour the batter into the hot pan, and transfer it immediately to the preheated oven.

4.   let it bake for 20-25 minutes until the sides and top are golden brown, the pancake is puffy, and there is no more raw batter. let cool slightly, then top with the sauteed apples. squeeze lemon juice over the top (optional) and serve warm.

tips:

- refrigerate any leftovers in a tightly sealed container, and reheat in the oven or toaster oven.

- as the pancake does not have sugar added, i like to use a sweeter variety of apple like fuji or golden delicious.


Sunday, February 3, 2013

sweet potato chili


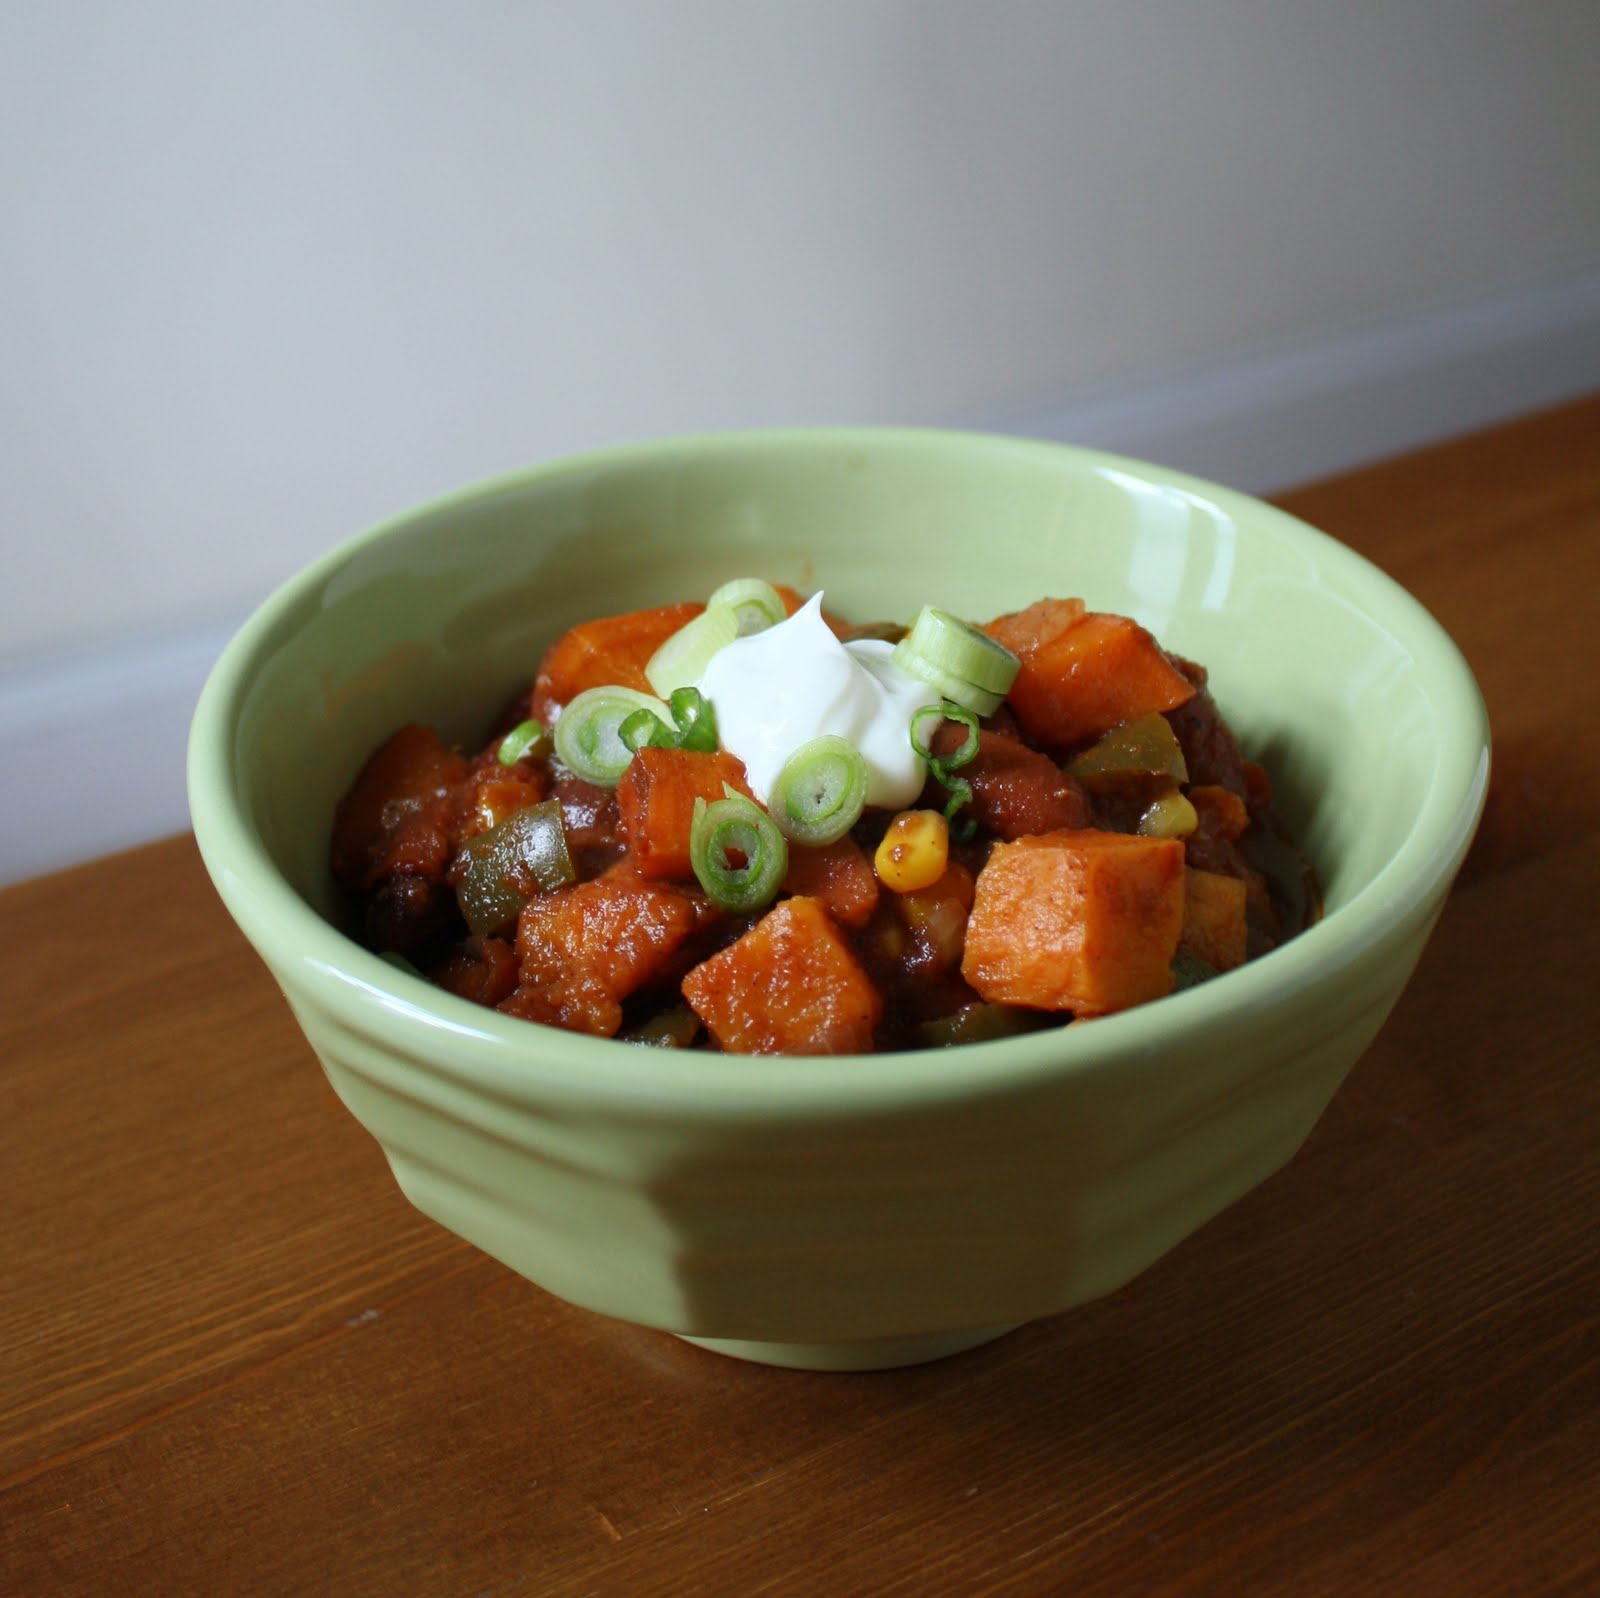
the winter chill has set in, and while that doesn't make for wonders in the fresh produce department, there are still plenty of things to buy at the farmer's market. root vegetables store well, and are a perfect addition to this vegetarian sweet potato chili recipe.


i found this recipe while looking to use my slow cooker. once you prep your ingredients, it is easy to throw everything together and let it cook all day. this is not only an easy way to have a meal ready - it also lets the flavors meld together. if you don't have a slow cooker, try simmering the ingredients together with a little extra liquid, for a few hours on low heat over the stovetop.

to prep, first chop up your sweet potatoes into cubes and put them in the bowl of slow cooker.


chop the green pepper, onion, garlic, and almost all the prep is done!


i like to take the harsh edge off the flavor of onion and garlic before adding them to the slow cooker. i added this step, so if you want to skip it, the chili should still turn out fine. after caramelizing in a bit of olive oil, they should look something like this:


measure out the spices. do cinnamon and cocoa sound weird in chili? trust the recipe, it brings a warmth to the spice mix just like a mole sauce. rinse the black and kidney beans if using canned, and add them to the bowl of the slow cooker with the chopped green pepper.


if you want all the work to be done, you can slice up the scallions ahead of time.


to make it easy to start the slow cooker in the morning, you can refrigerate your prepped ingredients until you are ready to start the slow cooker. Then you can just add all the pre-chopped ingredients to the bowl at once.


add the tomatoes and water last, then give the mixture a stir.


after 7 hours on low, the sweet potatoes should be soft, yet still hold their shape. 


dish into bowls, top with sour cream or greek yogurt, and sprinkle on some scallions. this chili is also delicious reheated the next day.


sweet potato chili
recipe based on: slow-cooker chili from real simple

ingredients:

1 medium onion (red or yellow), chopped 
5-6 cloves garlic, minced or pressed
2 tsp extra virgin olive oil 

1 green bell pepper, chopped
1 tbsp chili powder
1 tbsp ground cumin
2 tsp unsweetened cocoa powder
1 tsp salt
1/4 tsp ground black pepper
1/4 tsp ground cinnamon

1.5 cups black beans or 1 15.5 oz can black beans, rinsed
1.5 cups kidney beans or 1 15.5 oz can kidney beans, rinsed 
1 cup corn (i used frozen)
2 small sweet potatoes, cut into roughly 1/2 inch cubes
1 28 oz can fire roasted tomatoes
1 cup water

to serve:
sour cream or greek yogurt
2-3 scallions, sliced

directions:

1.   heat the 2 tsp olive oil over medium heat for a few minutes to warm the pan. add the chopped onion and saute for 2-3 minutes. once onion starts to soften, add the minced garlic and let cook for 2 more minutes, stirring a few times. once the onions have some browning, they are ready.

2.   add the onion/garlic, bell pepper, spices, black beans, kidney beans, corn and sweet potatoes to the bowl of your slow cooker. pour the diced tomatoes on top and add about 1 cup of water. give the ingredients a stir.

3.   set the slow cooker for 7 hours on low. alternatively, you can set it for 4 to 5 hours on high. after 7 hours on low, the sweet potatoes should be cooked and the chili is ready to eat! serve with a spoonful of sour cream or greek yogurt on top and sprinkle with sliced scallions.